Surya Namaskar, also known as Sun Salutation, is one of the most popular and effective yoga sequences. If you want to know the Surya Namaskar steps in detail with tips for beginners, benefits, and the best time to practice, you’re at the right place. This article covers everything you need to start your Sun Salutation journey effectively:
What is Surya Namaskar?
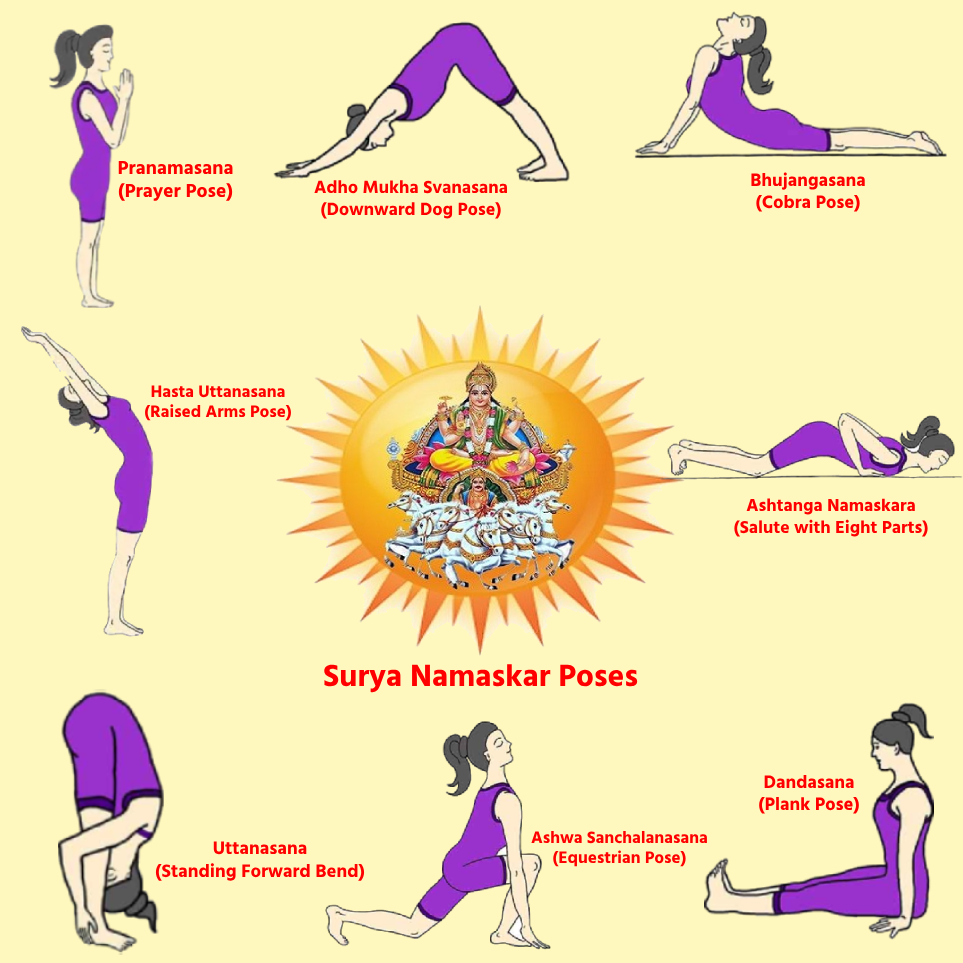
Surya Namaskar means “Salutation to the Sun.” It is a series of 12 yoga poses linked with mindful breathing. Each pose stretches different parts of the body and stimulates vital organs. This ancient practice boosts physical fitness, improves flexibility, and balances your energy.
Surya Namaskar Steps List
| Step | Step Name | Key Action | Breathing |
|---|---|---|---|
| 1 | Pranamasana (Prayer Pose) | Stand straight, hands in prayer position. | Inhale |
| 2 | Hasta Uttanasana (Raised Arms Pose) | Stretch arms upward, arch back slightly. | Inhale |
| 3 | Uttanasana (Standing Forward Bend) | Bend forward, touch toes (keep knees soft). | Exhale |
| 4 | Ashwa Sanchalanasana (Equestrian Pose) | Step right leg back, left knee bent. | Inhale |
| 5 | Dandasana (Stick Pose) / Plank Pose | Step left leg back, align body straight. | Hold |
| 6 | Ashtanga Namaskara (Salute with Eight Parts) | Knees-chest-chin down (8 parts touch floor). | Exhale |
| 7 | Bhujangasana (Cobra Pose) | Lift chest, keep elbows bent. | Inhale |
| 8 | Adho Mukha Svanasana (Downward Facing Dog Pose) | Hips up, heels down (V-shape). | Exhale |
| 9 | Ashwa Sanchalanasana (Equestrian Pose) | Step right foot forward, left leg back. | Inhale |
| 10 | Uttanasana (Standing Forward Bend) | Bring left foot forward, bend down. | Exhale |
| 11 | Hasta Uttanasana (Raised Arms Pose) | Stretch up, arch back slightly. | Inhale |
| 12 | Mountain Pose (Tadasana) | Return to standing, hands in prayer. | Exhale |
If you understand the Surya Namaskar 12 Steps and practice them mindfully, it becomes more than just a simple yoga routine, it turns into an awakening of life energy. If you wish to integrate mantras with your Surya practice, then articles like Surya Namaskar Mantra in Kannada, Surya Beej Mantra, 12 Surya Mantras, and Surya Arghya Mantra will guide your practice in a new direction.
Surya Namaskar 12 Steps: with Breathing Guide
There are detail view of 12 Surya Namaskar Step By Step in one complete cycle . Each step has a specific posture and breathing pattern.

Step 1. Pranamasana (Prayer Pose)
Stand tall with your feet together, keeping your body relaxed yet erect. Bring your palms together in front of your chest in the ‘Namaste’ or prayer position. Close your eyes gently and take a moment to focus on your breath and prepare your mind for the practice.
Breathing: Exhale slowly and completely, releasing any tension.
Step 2. Hasta Uttanasana (Raised Arms Pose)
Inhale deeply as you raise your arms slowly above your head. Stretch your fingers upward and slightly arch your back by gently leaning backward, opening your chest. Keep your biceps close to your ears and gaze softly towards your thumbs or sky. Feel the stretch along your whole body from feet to fingertips.
Breathing: Inhale fully while lifting your arms.
Step 3. Uttanasana (Standing Forward Bend)
Exhale completely as you bend forward from the hips, not from the waist, keeping your spine long. Allow your head to relax and try to bring your palms to the floor beside your feet, or hold your ankles or toes if possible. Avoid locking your knees; a slight bend is okay if your hamstrings are tight. Feel the stretch in your back and legs.
Breathing: Exhale slowly while folding forward.
Step 4. Ashwa Sanchalanasana (Equestrian Pose)
Inhale as you step your right leg far back, placing the knee on the floor if needed, while bending your left knee forward so that it is positioned between your palms. Keep your hands firmly on the ground and lift your chest and head to look straight ahead. Your back leg should be straight and toes pointing backward. This pose stretches the hips and strengthens the legs.
Breathing: Inhale deeply while stepping back and lifting your chest.
Step 5. Dandasana (Stick Pose) / Plank Pose
Hold your breath as you bring yourleft leg back to meet the right, forming a straight line from head to heels. Support your body weight on your hands and toes, keeping your arms straight but elbows not locked. Engage your abdominal muscles to prevent sagging in the lower back. Maintain a strong, firm posture like a plank.
Breathing: Hold your breath steady.
Step 6. Ashtanga Namaskara (Salute with Eight Parts)
Exhale fully as you gently lower your knees, chest, and chin to the floor, keeping your hips slightly raised. Eight points—both feet, both knees, both hands, chest, and chin—should touch the ground. This posture strengthens the arms, chest, and legs while protecting the spine.
Breathing: Exhale fully while lowering down.
Step 7. Bhujangasana (Cobra Pose)
Inhale as you slide your body forward and lift your chest up by straightening your arms. Keep your elbows slightly bent and close to your body. Roll your shoulders back and down, open your chest wide, and gaze upward. Keep your legs and feet flat on the floor, pressing them down for support. This pose opens the chest and stretches the spine.
Breathing: Inhale deeply while lifting the chest.
Step 8. Adho Mukha Svanasana (Downward Facing Dog Pose)
Exhale as you lift your hips up and back, forming an inverted V shape with your body. Keep your spine long and straight, and try to press your heels toward the floor (a slight bend in knees is fine if hamstrings are tight). Spread your fingers wide and press firmly into the palms. Relax your head and neck, letting your gaze fall between your feet or toward your navel. This pose stretches the back, legs, and arms.
Breathing: Exhale slowly while lifting hips.
Step 9. Ashwa Sanchalanasana (Equestrian Pose) — Repeat on other side
Inhale as you bring your right foot forward between your hands, bending the knee and placing it firmly on the floor. Keep your left leg stretched backward with the toes curled under. Lift your chest and head, looking forward, keeping your palms flat on the floor. This is a mirror of Step 4 on the opposite side.
Breathing: Inhale fully while stepping forward and lifting chest.
Step 10. Uttanasana (Standing Forward Bend) — Repeat
Exhale as you bring your left foot forward to meet the right. Bend forward from the hips with a long spine, trying to touch your palms to the floor beside your feet or holding your ankles/toes. Relax your neck and let your head hang heavy.
Breathing: Exhale fully while folding forward.
Step 11. Hasta Uttanasana (Raised Arms Pose) — Repeat
Inhale deeply as you rise slowly back up with a straight spine. Raise your arms overhead, arch your back slightly, and gaze at your thumbs. Feel the stretch extending from your heels through your arms.
Breathing: Inhale fully while lifting the arms.
Step 12. Mountain Pose (Tadasana) — Complete the cycle
Exhale as you bring your arms down slowly and join your palms together in front of your chest. Stand straight, feet together, and relax your shoulders. Close your eyes if you like, feeling the energy flowing through your body after completing one full cycle of Surya Namaskar.
Breathing: Exhale deeply and relax.
This completes one full round of Surya Namaskar. For best results, practice 6-12 rounds daily, moving smoothly from one posture to the next with mindful breathing.
Why Practice Surya Namaskar?
- Improves Flexibility: Regular practice tones muscles, improves joint mobility, and strengthens the spine.
- Enhances Metabolism: Activates the digestive system and helps in weight management.
- Mental Clarity & Stress Relief: The combination of movement and breathing reduces anxiety and increases focus.
- Energizes the Body: Practicing at sunrise energizes the entire body and mind.
- Promotes Overall Health: Supports cardiovascular health, improves circulation, and boosts immunity.
Tips for Beginners to Practice Surya Namaskar
- Start with 3-5 cycles and gradually increase to 12 cycles as you build strength and flexibility.
- Perform the sequence slowly, synchronizing each posture with your breath.
- Wear comfortable clothes and practice on a yoga mat or non-slippery surface.
- Practice early morning on an empty stomach for best results.
- Consult a yoga instructor if you have any medical conditions.
Common Mistakes to Avoid
- Not coordinating breath with movement.
- Forcing your body into a posture, risking injury.
- Holding breath for too long.
- Skipping warm-up before practice.
- Practicing immediately after meals.
Surya Namaskar is more than just a set of yoga poses — it’s a holistic exercise that nurtures your body, mind, and spirit. By mastering these steps with proper breathing, you invite health, vitality, and positivity into your life. Start today,
FAQ
How many steps are there in Surya Namaskar?
There are a total of 12 steps in Surya Namaskar, which together form one complete cycle.
Is there a breathing pattern for each step?
Yes, the sequence of inhaling and exhaling is very important in each posture.
Is it necessary to chant mantras with each step?
Not necessary, but practicing with mantras enhances mental strength.

मैं पंडित सत्य प्रकाश, सनातन धर्म का एक समर्पित साधक और श्री राम, लक्ष्मण जी, माता सीता और माँ सरस्वती की भक्ति में लीन एक सेवक हूँ। मेरा उद्देश्य इन दिव्य शक्तियों की महिमा को जन-जन तक पहुँचाना और भक्तों को उनके आशीर्वाद से जोड़ना है। मैं अपने लेखों के माध्यम से इन महान विभूतियों की कथाएँ, आरती, मंत्र, स्तोत्र और पूजन विधि को सरल भाषा में प्रस्तुत करता हूँ, ताकि हर भक्त अपने जीवन में इनकी कृपा का अनुभव कर सके।जय श्री राम View Profile