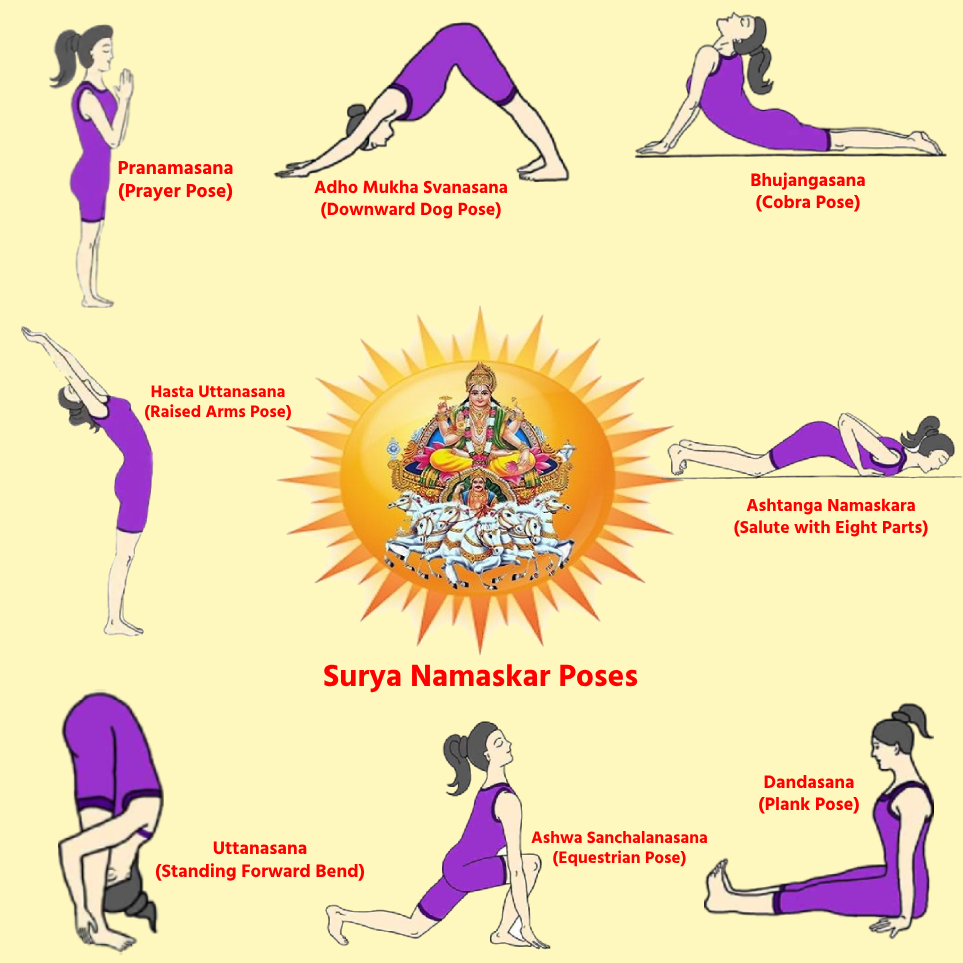
When someone searches for Surya Namaskar Poses, their aim is to properly understand each step of Surya Namaskar and adopt it in practice. Surya Namaskar is a sequence of 12 yoga postures, where each pose not only awakens the body but also brings balance to the soul. We have explained it here in simple and easy words in detail –
What is a Difinetion of Surya Namaskar
Surya Namaskar, or Sun Salutation, is one of the most powerful and ancient yoga sequences. It consists of a series of 12 poses (asanas) performed in a smooth flow, combining breath and movement. Practicing these poses regularly not only improves physical health but also balances the mind and spirit.
Surya Namaskar Poses – Step-by-Step Guide to the Sun Salutation
Here’s a step-by-step guide to the 12 Poses of Surya Namaskar along with simple instructions:

1. Pranamasana (Prayer Pose)
- How to do: Stand straight with feet together. Join your hands in front of the chest in a prayer position.
- Breath: Exhale deeply.
- Benefit: This pose calms the mind and prepares the body for practice.
2. Hasta Uttanasana (Raised Arms Pose)
- How to do: Inhale and raise your arms upward while slightly bending your body backward.
- Breath: Inhale deeply.
- Benefit: This pose stretches the spine and helps the lungs take in more air.
3. Uttanasana (Standing Forward Bend)
- How to do: Exhale and bend forward from the waist, trying to touch your feet or the ground with your hands.
- Breath: Exhale fully.
- Benefit: This stretches the lower back and hamstrings and reduces stress.
4. Ashwa Sanchalanasana (Equestrian Pose)
- How to do: Inhale and move your right leg backward with the knee touching the ground. Keep your left leg forward with the foot flat on the floor. Lift your chest and head up.
- Breath: Inhale.
- Benefit: This increases flexibility in the hips and thighs.
5. Dandasana (Plank Pose)
- How to do: Hold your breath and bring your left leg back to meet the right. Keep your body straight, supported on your palms and toes.
- Breath: Hold breath.
- Benefit: This strengthens the entire body, especially the core muscles.
6. Ashtanga Namaskara (Salute with Eight Parts)
- How to do: Exhale and lower your knees, chest, chin, and palms to the ground while keeping hips raised. Eight parts of the body touch the floor.
- Breath: Exhale.
- Benefit: This pose balances the body and stretches muscles.
7. Bhujangasana (Cobra Pose)
- How to do: Inhale and lift your chest up by straightening your arms. Keep shoulders relaxed and look backward.
- Breath: Inhale.
- Benefit: Strengthens the spine and relieves lower back pain.
8. Adho Mukha Svanasana (Downward Dog Pose)
- How to do: Exhale and raise your hips up, forming an inverted ‘V’ shape with your body. Keep hands and feet firmly on the ground.
- Breath: Exhale.
- Benefit: Stretches the whole body and improves blood circulation.
9. Ashwa Sanchalanasana (Equestrian Pose)
- How to do: Inhale and bring your right leg forward with the foot flat on the floor. Lift your chest and head up.
- Breath: Inhale.
- Benefit: Opens up the hips and energizes the body.
10. Uttanasana (Standing Forward Bend)
- How to do: Exhale and bring your left leg forward. Bend forward from the waist again, trying to touch the feet or ground.
- Breath: Exhale.
- Benefit: Improves digestion and relaxes the spine.
11. Hasta Uttanasana (Raised Arms Pose)
- How to do: Inhale and raise your arms up, bending your body slightly backward.
- Breath: Inhale.
- Benefit: Enhances energy flow and stretches the spine.
12. Pranamasana (Prayer Pose)
- How to do: Exhale and bring your hands back to the prayer position at your chest. Stand straight.
- Breath: Exhale.
- Benefit: Concludes the practice and calms the mind.
These 12 poses of Surya Namaskar provide complete health for your body, mind, and soul. Regular practice will help you feel more energetic, flexible, and mentally peaceful. Include it in your daily routine and see the improvement in your health.
Tips for Practicing Surya Namaskar Yoga Poses
- Breath Synchronization: Always coordinate your breath with movement for maximum benefit.
- Start Slowly: Begin with 3-4 rounds and gradually increase to 12 or more as you gain strength and flexibility.
- Practice Early Morning: Early morning is considered the best time to perform Surya Namaskar for maximum energy and benefits.
- Wear Comfortable Clothing: Wear loose and comfortable clothes to allow free movement.
- Stay Hydrated: Drink water before and after practice but avoid heavy meals before practice.
Why Practice these Poses?
Surya Namaskar tones the whole body, improves flexibility, strengthens muscles, and enhances cardiovascular health. It also calms the mind, reduces stress, and increases energy levels. Regular practice helps develop discipline, self-awareness, and spiritual connection.
If you want to know about the Surya Namaskar Benefits , the right time to practice it, or the methods related to Surya Mantras and Sun Worship along with 12 poses of Surya Namaskar , then do read our other articles like Benefits of Surya Namaskar, Surya Namaskar Mantra, and complete information related to Sun God Worship. This will help you deeply understand the correct poses of Surya Namaskar.
FAQ
How many poses are there in Surya Namaskar?
There are a total of 12 main stages (poses) in Surya Namaskar, which follow a specific sequence.
Does each pose have a different benefit?
Yes, each pose affects different parts of the body, such as flexibility, digestion, stress relief, etc.
Which poses are considered most important?
Coordination of all poses is necessary, but Bhujangasana, Parvatasana, and Padahastasana are considered especially effective.
Can any pose be skipped in the beginning?
Beginners can do limited rounds, but doing all the poses is essential for complete benefits.

मैं पंडित सत्य प्रकाश, सनातन धर्म का एक समर्पित साधक और श्री राम, लक्ष्मण जी, माता सीता और माँ सरस्वती की भक्ति में लीन एक सेवक हूँ। मेरा उद्देश्य इन दिव्य शक्तियों की महिमा को जन-जन तक पहुँचाना और भक्तों को उनके आशीर्वाद से जोड़ना है। मैं अपने लेखों के माध्यम से इन महान विभूतियों की कथाएँ, आरती, मंत्र, स्तोत्र और पूजन विधि को सरल भाषा में प्रस्तुत करता हूँ, ताकि हर भक्त अपने जीवन में इनकी कृपा का अनुभव कर सके।जय श्री राम View Profile